This upcoming year.

I have taken the last couple days and started thinking about this coming year and what I want to accomplish on the water.

First and foremost I have decided I want to be a little more active on the water. By that I mean I want to be able to go fishing more. A good way for me to come up with fresh topics for this column is to actually get out on the water with my fly rods and just try new things. By doing this I will find new flies, flies that work on the species we target here on the Northshore other than bluegill. I have a good handle on catching bluegill on the fly rod. That new job I took in October has given me the means to have more time on the water. I have every weekend off now and will be working fewer hours which means I might be able to get out on the waters closer to my house in the evenings.

Another thing I want to work on this year is figuring out how to catch bass on the fly. This one might take more than a year. In order for me to figure out bass on the fly, I need to become a better bass fisherman in general. When I was a kid and teenager I did a good bit of bass fishing with my dad. My dad was kind of stuck in his ways when it came to bass fishing. He used a texas rigged worm just about all the time. This kind of stunted my growth as a bass fisherman. We also fished the same spots every trip because we fished the same body of water every trip. While this makes me a great bass fisherman in Lac Des Allemands and Bayou Des Allemands, it doesn’t help me find bass on the rivers and bayous of the Northshore. For the past couple years, I have been fumbling around Bayou Lacombe and Bayou Cane and stumbling on stringers of fish. The main reason I started looking for a new kayak last year was that I wanted a depth finder. My old kayak just wasn’t suited one. I have been watching some videos on Youtube from people like Gene Jensen, Flukemaster, to learn a little bit more on how to find bass. One of the things I have taken away from his videos and emails with him is the use of a depth finder to locate structure and cover that hold fish. I have installed a unit on my kayak now and it should help me find fish quicker than I have. To bring this back to fly fishing, this will allow me to present flies to these fish as well as conventional lures.

A third thing I want to work on is making more informational videos on my YouTube channel. This past year I would just make videos when I would catch fish on my trips. While this will continue, I want to start incorporating my own voice to the videos rather than just a music bed under the video.

Something else I plan to work on is exploring new waters. Since I began fishing the Northshore in 2012, I have only fished a handful areas: the rigolets, the trestles, Bayou Liberty, Bayou Lacombe, and Bayou Cane. This year I want to get out and learn new areas such as the Rice Field Canal and the Tchefuncte. I am open to suggestions, just send me a message on the forums and I’ll do my best to get out there.

One other thing I want to do this year is fish some tournaments from my kayak. The ATAK is much more suited for tournament fishing than the Sundolphin was. For the past couple years, I’ve wanted to fish Ride the Bull, but was worried about getting out there in that little sit-in. It was kind of tippy and cramped. Since I couldn’t stand up in it, my back, hips, knees, and butt would start to hurt after a couple hours. All that has changed now that I can stand. Another problem I had with fishing tournaments was they all happen in places I’ve never fished. I didn’t want to get out there and not venture far from my launch site for fear of getting lost. The depth finder/gps I installed will help me return safely. I’m also thinking of working with a business on the north shore of Lake Pontchartrain to get a series of kayak tournaments there. I would much rather drive an hour to an hour and a half to fish a tournament rather than two and a half to three hours to Grand Isle or Venice.

That just about covers what I want to do this year. I hope it all pans out and hope to see you guys and gals out on the water. Tight lines!

JZ

This upcoming year.

Heartbreaking.

img_1148

Last week I was in Gatlinburg with my family on vacation. On Monday my father-in-law and I had a fly fishing trip booked with Fly Fishing the Smokies. We met up with the guide at 8 a.m. at the usual spot, Cherokee Fun Park, then headed out to the river where we would fish for the day in Bryson City , North Carolina. While gearing up for the day, I was talking with our guide Larry and he quickly came to the conclusion that I wasn’t a novice when it came to fly fishing. I brought my own rod, a 4 wt TFO finesse series, my net I use in my kayak, and my own pair of forceps. I figured the net and forceps would help so the guide wouldn’t have to keep moving between the two of us. When we had all squeezed in our waders we headed out into the river. Larry pointed me to a run to fish then pointed out a couple other runs that he thought would hold some trout. A few casts in I snapped off the fly. While making my way over to Larry I watched him net a nice brook trout my father-in-law hooked. I knew right then we were in for a good day. Larry gave me a couple few flies and a bit of 5X tippet and I headed back to my run I was fishing. A couple drifts in the run I was fishing and I landed a little brook trout. After a quick release, I was drifting the fly down the run again, this time with the GoPro running. A few drifts in the strike indicator hesitated and the fight was on. I hooked on to a pretty good brook trout that got off while I was trying to net it. At this point, I figured out that the trout were holding just before a rock ledge in the eddy. For the next 10 minutes or so I was getting hits almost every drift. I hooked a few of them and got them to the net and some self-released at my feet. They were a mixed bag of rainbow trout, brook trout, and brown trout. When the bite on that run died down I made my way a little downstream to another run. After a few good drifts there I was about to give up when I caught a nice brook trout. That thing had to be 16 inches long, the bad part. My GoPro wasn’t running when I caught it. I stayed there for a few minutes and after not getting any more hits, I moved on. I headed upstream to meet up with the guide and my father-in-law. Larry, the guide, pointed me to a little spot between 2 runs. He said one might not have fish but the other should. I fished there until it was time for lunch and ended up catching quite a few trout. After lunch, we fished closer to where we parked. Some little midges we hatching and several trout were rising, but we couldn’t figure out what the midges were so we stuck to what we were using before lunch. I caught a couple more trout as did my father-in-law. I was our guide casting a dry dropper rig trying to figure out what the fish were eating, but he never did. The day ended around 2 that afternoon. If you are ever up that way and want to do some fly fishing, give Fly Fishing the Smokies a call. Check out their website at FlyFishingtheSmokies.net. All the equipment you need to fish is provided at no additional charge. The only they don’t provide is the fishing permit.

Check out the video from the trip. Click here.

img_1140-1
The view from the back porch of the cabin

Now for the heartbreaking part. That area of the Appalachian Mountains has been under a severe drought. The week before we headed up there some forest fires started popping up around Asheville, North Carolina and seemed spread. We were concerned about the smoke from the fires would be hanging around Gatlinburg. That wasn’t the case. While we were there we had beautiful weather and no smoke in town or in Pigeon Forge. We left the day before Thanksgiving to head to my sister-in-law’s house in Nashville to spend Thanksgiving and we came home Saturday. On my way home from work Monday, I saw on facebook there was a fire in the national park around the Chimney Tops. Winds on Monday were gusting 60-70 miles per hour in Gatlinburg. Add to the wind the extremely dry conditions and that was the making of a raging fire that swept that area Monday night. Hundreds of homes are now destroyed and many businesses too. This breaks my heart to know that the place that I went on many family vacations is now suffering like my own community here in the Denham Springs/Baton

img_1135
To think that this is now a charred mountainside.

Rouge area. Back in August, we had extreme flooding here. 90% of Denham Springs and Livingston parish flooded. This is the reason for my lack of posts in the past few months. Many people lost everything here. And now to see another place that I love so dear going through a similar situation hurts my heart. I know many people in this are have been there when they were kids and are now taking their own children there for vacation. People of Gatlinburg and Pigeon Forge, you are in my thoughts and prayers as you start over too. I know you will recover and come back stronger than ever. I hope to be able to visit again next Thanksgiving. Godspeed and good luck.

IMG_9648
My wife and I. It’s heartbreaking to think this picture will not happen again for a long time.
Heartbreaking.

Choosing a fly reel and line


In a previous post, I covered fly rods. The rod is the most expensive piece you are going to buy in order to get into fly fishing and is the most important. In this author’s opinion, the fly reel is the second most important piece of equipment you will need because it holds your line and backing, more on those later in the post. In most cases you will not be fighting fish on the reel; you will typically hand line, or as it’s called in fly fishing, stripping the fish in. Because of this,  the reel is usually used to store your 90 feet of fly line and 100 yards or more of backing. When you hook a big fish, however, you will sometimes have to fight the fish on the reel, so now you have a decision to make: what kind of fly reel do you buy? They come in 3 different types: automatic, click and pawl, and disc drag.

  1. The automatic reel: these are not used very much today and only 2 companies, Martin and Pflueger, still produce them. They work by loading a spring when you pull out the fly line, similar to a tape measure. To recover your line, just press the lever and the automatic-fly-reel
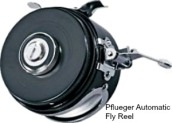
spring will release its tension and the line will be re-spooled into the reel. This is a great reel to have if you have mobility issues in your hands; however, for the day to day fly angler I wouldn’t recommend one. They are relatively heavy and throw your rig off balance. Also, the spring can release its tension if the reel is dropped or if you accidentally hit the lever.
  2. The click and pawl reel, sometimes called the spring and pawl reel is the simplest and usually the most inexpensive reel. It consists of 2 parts; the spool and the housing.OLYMPUS DIGITAL CAMERAThe spool has a fixed gear on the back side. That gear locks into a pawl and when the spool is moved forwards or reverse makes the classic clicking that most people associate with a fly reel. Because there is no adjustable drag on this reel, you palm the spool with your reel hand to slow down spool when fighting a big fish that is peeling off line. These reels are easily converted for either left or right-hand retrieve; before you put the line on the spool just turn the reel to whichever side you want. Then spool the line and you’re good to go. If you already have line spooled, just strip the line into a bucket and then reload the line.  If all you’re going after is bream, sacalait, and small to medium bass, the click and pawl reel is all you really need.
  3. The disc drag reel is probably the most common fly reel out there. They have the ability to provide some tension on the spool to slow down the fish. Most have a knob on one side of the reel that lets you adjust how much tension will be applied to the spool like a normal baitcasting or spinning reel. Just like the click and pawl reels, reels with a disc drag can be set up for either a left or right hand retrieve. Most come set up for a left hand retrieve out of the box. In order to change the retrieve, you usually have to flip a bearing or washer under the spool. Refer to owner’s “manual” that is included in the box with your reel.

Once you have decided on which type of fly reel you’re going to buy, you have to decide on what size reel to buy. Besides small, mid, and large arbor reels; fly reels are sold by what sized fly line they are rated to hold. Normally they are labeled to hold 2 different size line, such as a 3/4 reel. That means the reel will hold either 3wt or 4wt fly line. The only difference is how much backing you can spool before spooling your fly line. Just like switching the retrieve on a disc drag fly reel, refer the owner’s manual. There should be a little chart in it that will tell you how many yards of backing to use for whichever size line you will use. It is ok to use bigger fly line than what is suggested for your reel, just use less backing. At one point I was using 5wt fly line on my Albright 3/4 GPR fly reel. I have since put 4wt fly line on it to match my 4wt TFO rod.


Now that you have your fly reel, you need to put some line on it. This first line you need to put on the spool is some backing. Backing serves 2 purposes; it’s used as “filler” to make reeling in the fly line easier with fewer revolutions of the spool and gives you more line for when a fish takes all of you fly line. Backing is generally made of braided dacron in either 20 or 30-pound test. Unless you’re going after tarpon or bigger saltwater game fish 20-pound backing is all you need. Do not; however, use monofilament for your backing. It has too much line memory and will coil and tangle easily. It also can dig into itself on the reel which can also cause tangles.


Once you have some backing you need some fly line. The first thing you need to decide is what weight line. Get the weight line that matches the weight of the rod. It’s that easy. Next, you need to decide on what taper. Fly lines come in 3 different tapers: weight forward, double taper, and level.

  1. Weight forward taper. weight forward taper     The weight forward taper is the most commonly used line. The first 50 to 60 feet of line from the backing forward is called the running line and has a consistent diameter. The last 30 feet is where most of the weight is located and is called the belly. The last 5 feet or so then tapers back down to a thinner diameter to the tip so you leader can be attached. This line is easy to cast and give the greatest distance. For us down here, this is the taper we use and I recommend for anyone just beginning fly fishing.
  2. The double taper.double taper Double taper fly line has the majority of its weight in the middle and has the same taper on either end. The double taper works well for a more subtle presentation, but you lose some distance when casting. You can also reverse the line on the spool if one end gets damaged.
  3. Level line.  level taperThe level line has absolutely no taper in it at all. It is the same diameter from tip to tip. This taper is usually found on budget, or cheap, fly line. It has no advantage other than being less expensive.


Once you have chosen what taper, you need to decide on what type of fly line to get. There are 3 types of fly line to choose from: floating, sinking, or sink tip.

  • Floating line: Floating line does just what its name says: it floats. From the butt end that’s attached to your backing to the tip attached to you leader, it floats. It’s great for fishing all types of flies in shallow water, and by shallow, I mean up to 10 feet of water.
  • Sinking line: this is just the opposite of the floating line: from butt to tip it sinks. There are 8 types of sinking line. They range from Intermediate, then types 1 through 7. What’s the difference you ask? Sink rate. Each one sinks at a different rate. There’s is no standard in the sink rate between the manufacturers, but it should say on the package in inches per second, ips, what’s the sink rate. These lines are typically used for getting flies down to the fish when they are deep. These are generally used to fish lakes for trout, or in our area in the winter when fish have gone deep because of cold weather. Because the entirety of the line sinks, there is increased drag when setting the hook.
  • Sink tip: this is a combination of sinking and floating line. Typically the last 8 to 16 feet of the line sinks and the rest floats. This is useful because it reduces the drag of the line when setting the hook. Due to the fact that this and the sinking line sink, you won’t be able to fish dry flies and poppers.


Now that you know what kind of line you need, you need to figure out the weight of the line that you need. That’s the easiest part. Just match it to the weight of your rod. If you are still trying to figure out what size rod to buy I have a chart. Just match the size of the flies you’re going to fish to this chart. It will tell you what size rod and line you need.fly-line-chart


For fishing down here a weight forward, floating fly line is all you really need. You can fish streamers, nymphs, wet flies, dry flies, and poppers all on the same line. Also, look for a fly line with a welded loop on the end. The welded loop will let you change the leader easily without having to tie a new knot. Most of the tapered leaders you buy have what is called a perfection loop on the end for attaching it to your fly line. If the fly line you buy doesn’t have a welded loop on the end you’re either going to have to learn to tie a nail knot to attach the leader or create a loop at the end of your fly line making a perfection loop. Just type either of those into your favorite search engine and you will find videos that teach you both knots. Now I will say this NEVER USE A NO KNOT EYELET to attach the leader to your  fly line! This is important! Those things are terrible.They are basically a barbed needle that you push into the end of your fly line. The cause the tip of your floating fly line to sink. Just don’t use them. Nail knots and perfection loops are too easy to tie to use one of those things.

 nail_knot  perfection_loop_knot


As far as leaders go, that is a topic for a whole different post. For now either buy tapered leaders in 0X to 3X or just use a piece of monofilament 6 to 9 feet long.


You now have everything you need to know in order to go out and buy your first fly rod set up!

Tight lines

JZ <>

Choosing a fly reel and line

Cane bayou 7-17-16

IMG_0969

The wife and kid were in Nashville this weekend for her nephew’s birthday party, so I had a pass to take the kayak out to do some kayak bassin’. Work kept me off the water yesterday so I did what any fisherman would do, I went today. I got to the launch a little after 6 a.m. armed with 3 fresh packs of my favorite color Rage Craws and some Senkos for IMG_0970
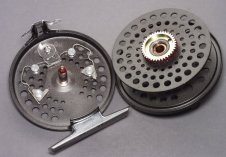
wacky rigging.  After unloading I was paddling down the bayou about 6:20. I started fishing at my normal spot, just behind Justin Wilson’s estate. Just like most trips, a fish was there. However, I missed it. After fishing there for a few more minutes I headed down stopping here and there with no bites. After seeing a good bit of surface activity I decided to pick up the 4 wt fly rod and throw a popping bug. After a few casts with no takers, I put it down and continued down Cane. I fished here and there throwing at every tree, lay down, and stump with no hits. It wasn’t until I got to what I call the Touchdown cut before I got a good solid hit. I set the hook and pulled in my first keeper bass of the day. By the time I got it in the yak and unhooked, the wind and current had pushed me on top of where I caught the fish. At that point,  I decided to let the current and breeze push me down the bayou all theIMG_0972 way down Cane to the lake. On my way down I only picked up a couple more bass and a few goggle-eye. When I got to the lake I decided to paddle back up to the Touchdown Cut and work down a couple hundred yards where I picked up a few more bass. When the fish bass quit in that stretch I decided to head back to the launch and head home. I finished the day with 6 keeper bass, caught 3 others that were too small, and probably 6 goggle-eye that I released. Everything was caught on a Strike King Rage Craw, Texas rigged with a 1/16 ounce weight. I tried lipless crank baits, a couple different patterns of flies, and wacky rigged Senkos.

IMG_0977

Until next time, tight lines and dripping paddles….brah

JZ   <>


Cane bayou 7-17-16

ATAK Acquisition update

About a month ago I had finally made my decision on what to buy for my new kayak. It was the Wilderness Systems ATAK 140. I had already started saving and was well over halfway to the goal of the MSRP of the kayak. I even found that The Backpacker in Baton Rouge had a 2015 model available for $1500. I was getting ready to go put some money down on it so they would hold it for me for the next three months while I got the rest of the money. Well, that week my wife and I notice one of our dogs, Gracie, seemed to be having a little trouble seeing. She was diagnosed with diabetes in May and had developed cataracts which were causing her to go blind. The vet said that it was treatable through surgery but could be expensive. We took her to the LSU Vet clinic to get here diabetes controlled and to have a consultation with a veterinary ophthalmologist. The ophthalmologist said that Gracie was a good candidate for the surgery and it would be just north of $4000 to do the surgery. Guess where all the money I had saved is going now? You guessed it, to the surgery and not my kayak. Let’s fast forward a couple weeks, my in-laws were very unhappy with the guy doing the lawn service at their house and office so they fired him. My wife knowing that I had done lawn care for 10 years asked them if I could mow the yards to make some extra money. She talked to me about it, and for a hundred bucks a week, I took the job. So I am now back to saving for the kayak. Now, let’s add another wrinkle to this story. ICAST was held this week and we had quite the announcements by most of the major kayak manufacturers. One of which I was waiting on; the one from Wilderness Systems. For the last year or so there had been rumors floating around that they would be introducing a pedal drive for the ATAK and all other models that have the Flex Pod OS. The announcement came and unfortunately the pedal drive, they’re calling it the Helix PD, would not be compatible with the ATAK. Instead, it would be for a new model called the Radar. This was a little disappointing. Then their next announcement: a new, shorter ATAK. The new ATAK is the ATAK 120, a 12 ft. version, that will be available in November. Not only is it in the length I want, but it’s also going to be $150 cheaper than the 14 ft. model. So, if all goes well, I should have an ATAK 120 in either November or December.


Tight lines and dripping paddles

JZ

ATAK Acquisition update

Choosing a fly rod

Choosing a fly rod


You have decided you want to start fly fishing. Congratulations, you are about to enter into a new world of fishing. There is nothing like catching a pound and a half sacalait on a fly rod. Even those 6 inch bream can feel like a monster on the fly. You now need to purchase a rod, reel, and line to get started. Lucky for you we now have the internet to research andFly rod pic 
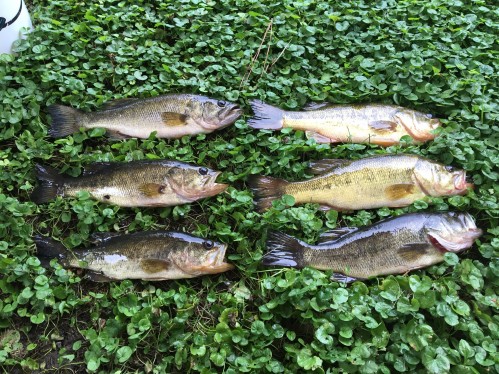
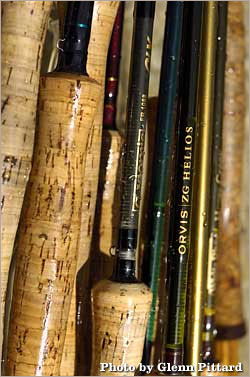
figure out what is the best outfit for you. I was not so lucky when I got into the sport in the mid ‘90’s. All I had was my dad. He gave me an old fly rod with and old automatic fly reel. I would later buy a really cheap combo from Academy and became a really nuisance to the bluegill population in the drainage canal at the end of my street. Since then I have learned most of the terminology in fly fishing when it comes to the “hardware”. I’ll share most of that now to take the mystery out of choosing your first set up.


The first thing you are going to need is probably the most obvious; the fly rod. Fly rods are long and limber. When used in combination with the matching weight line, I’ll get to that in a minute, you can cast the sometimes near weightless fly. Most of the rods you will find are made from fiberglass, graphite, or bamboo.

Fiberglass: these rods are tough, moderately light, relatively inexpensive, and tough. The stand up well to general neglect and are cheap enough to have as a back up rod.


Graphite: These are the most popular rods out there. They are strong, easy to cast, and low maintenance. They range in price from “That’s not bad” to “Holy cow, who can afford that?” I’ve been eyeing an Orvis Helios 2 that is in the latter category. With a price range starting in $800 range, the Helios 2 is what most experienced fly anglers want. Since I’m on a budget and saved up gift cards, I use Temple Fork Outfitters Finesse series rod. TFO is not paying me say this. I purchased the rod at full price, but I love that rod. It’s light and has an unbelievable warranty, I’ll get to that later in the post. Now if Orvis wants to give me a Helios rod, I would name drop them 20 times in every post. Until then I’ll tell you what I buy and trust. A word about price: the cheaper the graphite rod the heavier it’s going to be. As the price goes up, the lighter the rod will be.

Bamboo: The first fly rods were made of bamboo. I’ve never fished with one because they are expensive. They start in the $1000 range! They are also not for the beginner and require a considerable amount of care and maintenance. They are also quite heavier than the graphite and fiberglass. If you are buying your first rod, I would recommend graphite.


Line weight

Fly line comes in different weights that were measured in grains, kind of like bullets. Since most people do not understand that, manufacturers assign a number to lines from 1 to 14. The bigger the number of the line, the bigger the fly can be cast. Rods come in weights as well. Match the rod weight with the line weight. The line weight you chose will depend on what you will primarily target. For bream and sacalait, I recommend 3 to 5 wt; bass, 6 to 8 wt; and for redfish 7 to 9 wt rods.  


Rod length is another thing to consider, although it’s not that important for fishing down here. Depending on the manufacturer, you can find rods from 6 ft. long to 10 ft. long. For 3b6d189d75b37eed0dedc8c3025c65fb
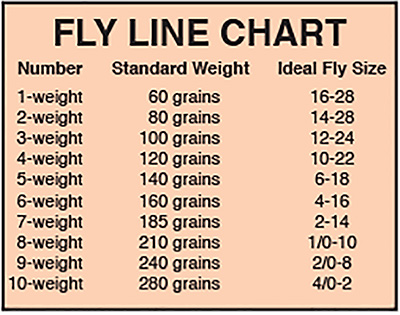
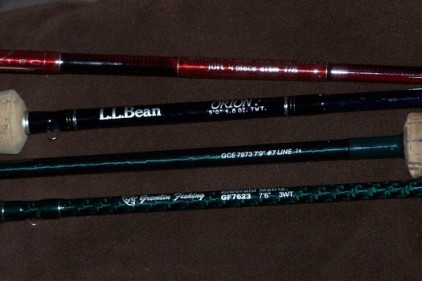
fishing here in south Louisiana an 8 and a half or 9 ft rod is all you need. You’re also going to find rods come in 1, 2, 3, or 4 pieces. You’ll find more 3 or 4 piece rods locally. This choice is all personal preference.


Another tip I give, is if you’re going after the bigger stronger fish like redfish, jack crevalle, and to an extent bass, get a rod with a fighting butt. A fighting butt is just a little extension on the end of the fly rod that is covered with the same material as the handle. It’s there so you have something that you can press against your belly so you can get better leverage when fighting bigger fish. Most rods 8 wt and above have a fighting butt.


Another thing to consider when buying a fly rod is a warranty. Since fly rods are considerably longer than casting rods, you will be prone to have an accident with them and probably break them. I have heard of people closing them in car or house doors, jamming them against their ceilings, smacking them against trees while fishing, or breaking them on a big fish. For those reason and many more, I recommend getting a rod with a warranty. Orvis rods come with a 25 year warranty that covers breakage on anything but intentional breakage. Temple Fork Outfitters as well as Winston Rods gives you a lifetime warranty. A word of caution, the warranty doesn’t cover loss of a rod or a rod piece. If you are going to store you rode broken down make sure you store all the pieces together in the rod sock if it came with one, or get a rod tube. Rod tubes are great things to have for transporting your rod to the lake or with you on vacation. Because they are rigid you don’t have to worry about something breaking your rod in the truck or car. Also since they are as long as the individual pieces of your rod, you can keep your fly rod in your car, truck, or SUV all the time. I always have one of my fly rods in my truck and take it with us when we go to Tennessee for Thanksgiving.


With the exception of Tenkara rods and switch and spey rods, I think that will just about cover choosing your fly rod. I’ll cover reels, lines, and leaders in another post.


Tight lines

JZ.

Choosing a fly rod

I finally made my decision…

A few years ago I got into kayak fishing. I wanted a way to go fishing when my father in law wasn’t available to go or when I got off of work early, or to just go bass fishing. So in the fall of 2013 I started researching kayak fishing. At the time I  was looking for a cheap kayak to get me started. I figured there was no point in spending a couple grand on something if I would only use it a couple times and hate it. So I had decided by December that I was just going to ask for money for Christmas so I could go buy one of those Ascend sit on kayaks that Bass Pro sells. My wife during that time was also looking for affordable kayaks to get me one for Christmas. She had found Academy had a Pelican kayak on sale, but by the time she was able to get out there the sale had ended. She found the Walmart by Cortana Mall in Baton rouge was trying to get rid of some sit in kayaks they had in stock that weren’t selling. So for Christmas she got me a Sundolphin Excursion 10. It’s a 10 foot, sit-in kayak. It wasn’t exactly what I wanted, but it would do the job I needed it to do: get me off the bank and float. On January 12, 2014 I took made my first fishing trip in a kayak. You can read the fishing report here. After that trip I was hooked on kayak fishing and knew I was going to eventually need a new kayak. Since then I have made many trips in the Sundolphin on the northshore of Lake Pontchartrain and a couple trips around Grand Isle. I installed a few things to it to make fishing in it as comfortable as possible. After a trip with my kayak buddy Jeff Kreller this past December, I installed a Scotty flush mount to hold a fly rod holder. After that I had a decision to make: should I keep sinking money into that kayak or should I start looking for a new kayak. The decision was a pretty easy and quick one, I needed a new kayak.

The little Sundolphin was just lacking too many features I needed. The main one being space for gear. It has 2 flush mount rod holder and a small storage hatch in the stern of the kayak. The rod holders are good, but I can only use the one on the left side to hold a rod because I would hit the rod in the right one when casting. I got around this problem by only bringing 2 casting rods. The rod holder on the right side was used to hold my landing net.The storage hatch in the stern of the boat could only hold 2 small Plano boxes so everything else was stuffed in the cockpit of the kayak either in my feet or in my lap. Things like my cooler for fish and drinks, anchor and line, small tackle bag with my soft plastics and fly boxes. Things were cramped to say the least. One of the things I wanted most of all, a depth finder, just would not fit in the Sundolphin. There is no place to mount the transducer and nowhere to store the battery.

Before I started looking at new kayaks, I took the time between Christmas and New Year to figure out just what I needed in a kayak. I came up with a list:

  1. I needed space. Space for my cooler for drinks and the fish I wanted to take home. Space for tackle storage. And space for a depth finder and it’s battery.
  2. I needed something longer. A 10 ft. kayak is great for speed, but it  doesn’t track very straight. I could see the front of my kayak go from left to right with every stoke of my paddle.
  3. I needed something with more stability. While I never flipped my Sundolphin, I also planned my trips to places where I didn’t have to worry about rough water with limited boat traffic. I also preferred something I could stand up to fish in.
  4. I needed a sit-on. A sit on kayak makes for easier fishing.
  5. I needed something that had a lower profile. The wind would just position me how it wanted which made for less than ideal fishing in the marsh.
  6. I needed something with a bit of an open deck for fly fishing. The less things for fly line to get tangled in, the better.

With this list made I started looking at kayaks. I went back to looking at the Ascend kayaks that Bass Pro sells. I started reading reviews of them online and was less than impressed with them . If I was going to spend $500-$800 dollars I needed something with better reviews. I then went to Academy so see what they had. Academy sells kayaks made by Perception, Pelican, and Old Town. Everything they sell was between $500 and $1000. Around that time Pelican had released their new kayak: the Catch 120. The Catch 120 first caught my eye when one of the guys I follow on Youtube did a review of it. It’s 12 ft long and 34 inches wide which makes it stable enough to stand in. It’s also a tunnel hull. I started looking at other reviews of the Catch and saw a trend. Everyone was saying the same thing. It’s a good kayak, but it needs a rudder of some kind to help it track straighter and keep from getting wind-cocked.

About this time I decided consult with my kayak expert, Jeff Kreller. I needed advice, I was getting nowhere fast. Every kayak I looked at was just alright. Nothing was standing out to me as a boat I would use for more than a few years before wanting better. He pointed me to Jackson Kayaks; more specifically the Jackson Cuda. They are extremely stable and with a little practice I would be able to stand in it. They are also readily available used on resale sites. I also asked around on forums of Laflyfishing.com. I heard alot of good things about the Jackson Cuda. They also pointed me to Wilderness Systems as well. Three kayaks were being mentioned: the Jackson Big Rig, the Jackson Cuda, and the Wilderness Systems Ride.

I’m going to stop right here and mention a brand that I’m sure you are wondering where it’s at. I’m talking about Hobie. Hobie kayaks are amazing boats. Their Mirage line of kayaks offer a way to be able to fish without using your hands to paddle. I dreamed about owning a Hobie. The Pro Angler is probably the perfect boat for me. The problem I have with Hobie is the price. The Pro Angler is over $3000. The kayak I’ve decided on is a shade under $2000.

A couple of weeks ago I was not far from the Backpacker in Baton Rouge for work and had some time between jobs. I decided to go in and take a look at the Wilderness Systems kayaks. I was originally going to look at the Ride 135 because it was in my price range of about $1200. I looked at and liked it, but I saw the kayak I had been wanting since it came out last year. I’m talking about the ATAK.

The Wilderness Systems ATAK 140, or Advance Tactical Angling Kayak, was designed specifically for fishing. They took features from their two most popular kayaks and put them into the ATAK. There is a large storage area in the bow covered by a big hatch and a storage well just behind the seat. At the stern of the kayak there is a hatch that give access inside the hull for rod storage. It has the storage that I desperately need. In fact, it probably has more storage than I need. It’s 12 feet long and 34 inches wide with a huge open deck. The Flex Pod OS is the perfect place to install a depth finder. It has a place inside to store the battery and it’s a great place to install the transducer without having to drill through the hull.The think I like most of all about the ATAK 140 is it’s stability. I have seen many videos like this one of people doing extreme tests of it’s stability. With the exception of grabbing one side and flipping it, the kayak stays upright. Most of the reviews I have read are great. There are a couple things people gripe about, but I can look past them. The gripes that most people have are not that important to me.

The ATAK doesn’t come with much installed by Wilderness Systems, that includes rod holders. I really like this because it will let me install only what I need. Rod holders are easily added to a milk crate that fits nicely in the storage well behind the seat. It has SlideTrax installed on both gunnels that allow for mounts to be installed without drilling into the hull. The stern come pre-drilled for easy installation of a rudder kit or it’s a great place for a Power Pole Micro. The AirPro 3D Seat, sold separately of course, easily installs on the SlideTrax and gives a higher sitting position for sight fishing redfish in the marsh.

Remember the Flex Pod OS? It’s removabe. Not only is it removable, but it’s another way that the ATAK is customize-able. As of now there is only one thing made to go in that spot; the Helix Drive. It’s a electric motor so you don’t have to paddle. It also comes with a price tag of 2 grand, so I will not be getting one. What I will look at getting; however, is the peddle drive that is being developed to fit in the place of the Flex Pod. It’s not out yet and hasn’t been introduced yet. Rumor has it Wilderness systems will unveil it at ICAST this July. Stay tuned for more on that.

After deciding that the ATAK 140 was going to be  my next kayak, I had to consult my better half. Even with the $1800 price tag, my wife was supportive of my decision….with a couple caveats. One being I had to try it out. She wanted me to be sure that was the kayak I wanted. The other is I had to save for it since we can’t afford to just drop almost 2 grand on a new kayak right now. This past Sunday I fulfilled the first. The Backpacker had a demo day at the LSU lakes and I went out and got to try it out. It paddles easily and is as stable as I hoped it was. Not only was I able to stand, I was able to stand and paddle. With a little time in it, and maybe the AirPro seat later on, I will have no problem fishing standing up in it.  Also, my paddle I have now will work with it which is another plus.  After 10 minutes with it, I knew that was the kayak I wanted. If I had the money I would have bought one on the spot. The ATAK 140 will be my next kayak.


***Disclaimer*** I am not being paid to endorse any of the products I mentioned or linked to in this post.

I finally made my decision…

Bayou Cane on the Fly

Yesterday was my  first Saturday off since we had the baby so I figured I would go fishing. I woke up at 4 a.m. loaded up and got on the road. I got to the launch at Bayou Cane just after 6. The water at the launch was black with tannin so I figured it was clear farther down. I unloaded everything I needed and shoved off.  I started the day throwing a rage craw, but wasn’t getting any hits. I saw alot of surface activity so I picked up the 4 wt fly rod and tied on a foam grass hopper. Almost immediately I was getting swirls at the fly then one ate it. It was a decent size male bluegill, but not a bull by any means. Drifted down the Cane alternating between throwing the fly rod and a Texas rigged BioSpawn plasma tail worm. I threw the worm at a cypress tree a little farther out from the bank and got a good hit, but nothing on the hook set. On the next cast I found out why, it wasn’t a bass it was a goggle eye. I played around there for a few minutes with the fly rod and caught a couple goggle eye and a few female bluegill. I drifted down the bayou throwing the worm with no takers. When I got to the touchdown trees the wind was whipping pretty good there so I figured it was best to start making my way back up the bayou. Before I started back I tied on one of my own white popping bugs and fished that exclusively  all the way back. I when I got in front of a cut with a stump at the mouth I caught a nice bull bream. A couple casts later I caught a 10 inch bass. I stayed there for about 10 minutes catching every 3rd or 4th cast. When the action there died down I halfheartedly fished a few spots on the way back to the launch and picked up a few more bream and goggle eye. I called it quits about noon. Everything I caught was released to fight another day.
The water clarity was about an 8. If I had the ATAK I probably could have tried sight fishing for bass. But that will have to wait a few months until I have the funds for it.

Tight lines.

Check out my YouTube channel the video from the trip.

Bayou Cane on the Fly

Stocking the Fly Box

A few weeks ago I did an interview with Keith Lusher for the Northshorefishingreport.com segment on More Outdoors on 3WL out of New Orleans. He asked one question that the answer could have filled 30 minutes wort of programming: what are some flies to have for freshwater? These are my recommendations on flies I keep in my box all the time. These are just some all around good flies to have. If you know anyone who ties flies, now is the time to be very nice to them since some of these can only be found at local fly shops.


  1. The woolly bugger. That right the old fashioned woolly bugger. The woolly bugger is a streamer fly that imitates a number of things depending on where in the country it’s woolly bugger
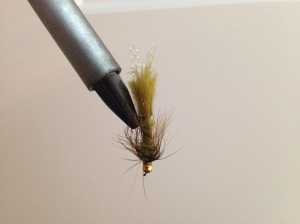
fished. Down here it can imitate large nymphs, baitfish, leeches,drowning terrestrial insects, worms, crawfish, or shrimp. You can find them from size 14 to 2. I have been known to tie them on a 2/0 pike hook with a weighted cone head, think bullet weight, and fish it like a texas rigged worm for bass. They are readily found at most fly shops in black, olive, and tan. If you know any fly tyers, then the color combinations are only limited by the colors of marabou and chenille available. Fish it with a steady retrieve or under a strike indicator. The “magnum” ones work for bass and the small to medium sizes will catch bream and sacalait.
  2. The Fluff butt. I’m not making this one up, I promise. The Fluff butt is a bead-head fluff butt
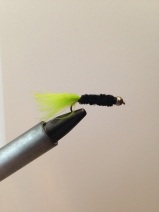
woolly bugger without the hackle. If you’ve ever fished a marabou jig on ultralight
    spinning tackle then you have fished a fluff butt. The fly version is tied on either a 1/120th oz or smaller jig head or on a streamer hook with a bead-head. Fish them by jigging them vertically, with or without a strike indicator, around trees for sacalait or with a slow retrieve. They catch bass, bream, and sacalait. This is one of those flies that is not readily available in fly shops, so you might want to find a fly tyer and ask them to make some for you.
  3. The Hare’s ear nymph. This has to be the most versatile fly out there along with it’s cousin the pheasant tail nymph. Personally I prefer the hare’s ear to the pheasant hare's ear nymph
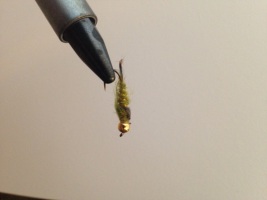
tail because it can be tied in a variety of colors. You can find them in black, brown, or olive and in bead-head and standard(nonbead-head). They are typically tied in sizes 10 to 16. I prefer the 2 in the middle, sizes 12 and 14. Remember I said they are versatile, they imitate a variety of aquatic life; scuds, sow bugs, mayfly nymphs, caddis larvae, damselfly larvae, dragonfly larvae, and stonefly larvae. I fish them year round. Because of how small they are you will catch a bunch of fish and many of them small, but when fished in the cooler months you will catch  some of the bigger bream on them. Fish them with or without a strike indicator but fish them slow, the things they imitate don’t move very fast.
  4. The Clouser Deep minnow. The Clouser deep Minnow created by Bob Clouser, a clouser minnow
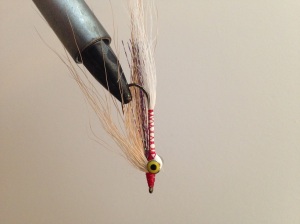
Pennsylvania fly shop owner and guide, in 1987. It was evolved from traditional bucktail streamers for smallmouth bass on the Susquehanna River. Noted fly fishing writer Lefty Kreh claims to have caught over 87 species of game fish on Clouser minnows, he is also the one who gave them their name in 1989. This fly a baitfish imitation that ranges in size from 10 up to 1/0. They come in a myriad of color combinations with the “belly” traditionally being white. The lead eyes are are tied on so the fly rides hook point up so it can be relatively weedless. Fish them in either fresh or saltwater, the work just as well for specks and redfish as they do for bass.
  5. The Crappie Candy. When the sacalait are feeding on shiners and minnow this is the best fly I have found to catch them. This fly is sort of a combination of woolly bugger and Clouser minnow. It has lead eyes tied on to make it ride hook point up with but acrappie candy 
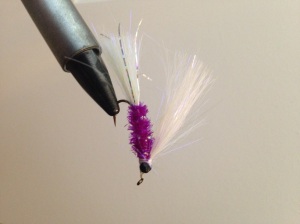
body of chenille with a wing and tail of fur. I personally tie these from a size 12 and 10 for sacalait up to a size 4 for bass. Fish them with or without a strike indicator. This is another of those flies that can be a bit of a pain to find. The only place I have found them is at the Green Trout in Baton Rouge, and even then it’s in limited quantities. That is the reason I learned how to tie them myself. I tie them in all sorts of colors: black and chartreuse, black and pink, chartreuse and white, pink and white, pink and chartreuse, purple and white. If you can’t find them at the fly shops in the area, then ask your local fly tyer or I might be convinced to make some. If you are a fly tyer go to Onthevise.com and seach “crappie candy.”
  6. Foam terrestrials. I’m lumping in two different flies in on this one: the foam spiders foam grasshopperand foam grasshoppers. I’m putting these together because they are both made of foam and float, but have a different silhouette. You can find foam spiders at Academy and sometimes Walmart from Bett’s. I get my foam grasshoppers from Bass Pro. The bluegill love them! In the spring and summer fish them close to the bank and have fun catching fish. They don’t just work on bluegill, the also work on bass. My all-time best bass was caught on a size 10 foam grasshopper. The strike on that bass looked like a small bluegill eating the fly but ended up being a 5 and a half pound bass. They work!
  7. And finally….the popping bug. What fly list for south Louisiana would be complete without the popping bug? Everyone knows the popping bug. I make them by thepopping bug dozen in the spring and summer. In fact, I have 3 with the primer coat drying right now waiting for paint. Accardo used to be the name for popping bug. Unfortunately Accardo was bought by Bett’s a few years ago so now just about all the popping bugs you will find are made by Bett’s, but they use some of the old Accardo paint patterns. You can find small ones for bluegill, medium ones for bass, and big ones for redfish.

Now that you have a list of patterns to look for, it is time to talk sizes. Flies are sized by the size of the hook, not the size of the finished fly. Just like normal fishing hooks, the bigger the number the smaller the hook. That is until you get to 1/0 and up, then the bigger the first number the bigger the hook. When choosing what sizes of flies to buy, or make if you’re getting into fly tying, pick the size for the fish you’re targeting. Generally if I’m fishing for bream, I’ll fish flies in the 14 to 10 sizes. For sacalait, I’ll fish flies up to 6. Everything bigger I consider a bass fly.


Some advice on when buying flies:

  1. Buy a couple different sizes.
  2. If the flies come in different colors, buy a couple different colors.
  3. Don’t buy just one. Buy at least 3 of each. This one is important. I made this mistake many times. I would see a fly that I really liked and would buy one to try and end up losing it some how. Most of the freshwater fish we target love cover. Whether that’s cypress knees, logs, stumps, or grass you will get hung up and most of the time have to break it off. If you have just one of a particular fly, and that fly is producing then you have to try something else. That second choice might not work as well and you have killed the trip.


Now that you have your shopping list it’s time to go shopping. With the exceptions of the fluff butt and crappie candy, the rest of this list can be found at Bass Pro, Cabella’s, Orvis, and most online retailers. The other 2, well you are going to have to do some digging on the Internet, or contact a fly tyer. If push comes to shove contact me on the forum, and I’ll make some for you…for a small fee to cover materials. Now get out and stock that fly box!


Here’s to happy fishing!

John “Vacherieboy” Zeringue
Check out my YouTube channel

Stocking the Fly Box

Cold Water Trout

IMG_0732


In my first post I mentioned “cold water trout” and I wasn’t talking about fishing specks in the winter. I was talking about the species of freshwater fish in the subfamily Salmoninae of the family Salmonidae. Some of these fish are brook trout, brown trout, lake trout, and rainbow trout. These fish are what fly fishing was made for. These fish typically live in clear streams and lakes in water temperatures between 50 and 60 degrees. Trout under 12 inches feed on insects, crustaceans, mollusks, and blood and mealworms which is why fly fishing a great way of fishing for them. Fly fishing was actually developed as a fishing technique so fishermen could use weightless lures to imitate the insects that trout feed on, that’s how flies, the lures, got their name. As years went on fly tyers adapted flies to mimic other things as well to target other fish in both fresh and saltwater, but we’re getting off subject.

I’m sure you’re reading this and thinking “John what does this have to do with fly fishing in around here?” Well the answer to that question is simple: in the winter time LDWF and a couple cities like Walker and Baton Rouge stock some ponds with rainbow trout. Zeemurray Park in Hammond and Torres Park in Chalmette are on the list for trout to be stocked in January and should have been stocked by now. Sidney Hutchison Park in Walker as well as 4 ponds in Baton Rouge were stocked with rainbow trout in December. For a list of ponds in Baton Rouge visit BREC.org. If you go out to try your hand at catching these trout know that you can keep 4 per person per day. You are actually encouraged to keep the trout you catch, up to 4 a day, because these fish will die once the water temperatures in the ponds get above 70 degrees.

Now that you know where they are, what do you use to catch them?  My personal favorite flies to use are bead head hare’s ear nymphs in size 12 or 14, woolly buggers in either olive or black in sizes 12 or 10, and egg flies if you can find them. When fishing these watch where your fly line and leader meet. You’re watching for twitches or sometimes the tip of the fly line will dart in any direction, or you can do like I do and fish with a strike indicator, more on those later. If you don’t have any strike indicators pick up the smallest cigar shaped bobbers, not the ones with a spring in them, and cut one in half. Thread that on your line with the cut side facing the fly and insert the stick. Voila, you just made a strike indicator! more specifically a vertically oriented strike indicator, or as we call it in the business, a VOSI. You could go to Bass Pro, Cabelas, or Orvis and pick up a pack of these little pinch on foam strike indicators. There are nothing more than a piece of foam with adhesive on one side and you peel it off the backing and fold them in half on you tippet so the adhesive side sticks to itself. Be warned, these are not adjustable! Where you stick it is how deep the fly will sink.

Keep an eye for fish rising. When they are rising, that is swirling on top the water, they are eating bug off the surface of the water. If you see them doing this, that is a great time to use either and emerger pattern or dry flies. I’ve heard people having great success with dry flies using a parachute adams fly. If you’re going to use dry flies make sure you have some fly dressing to dry the fly off so it continues to ride high on the surface.

Good luck chasing rainbeauxs!

JZ

Check out my YouTube channel

Cold Water Trout